What grit sandpaper for wood
Pick the right grit for bare wood, paint removal, between-coat sanding, and fine finishing. Find the row that matches your job, then a multi-grit pack that includes the grit you looked up. Already know the stage? Skip straight to the grit picker.
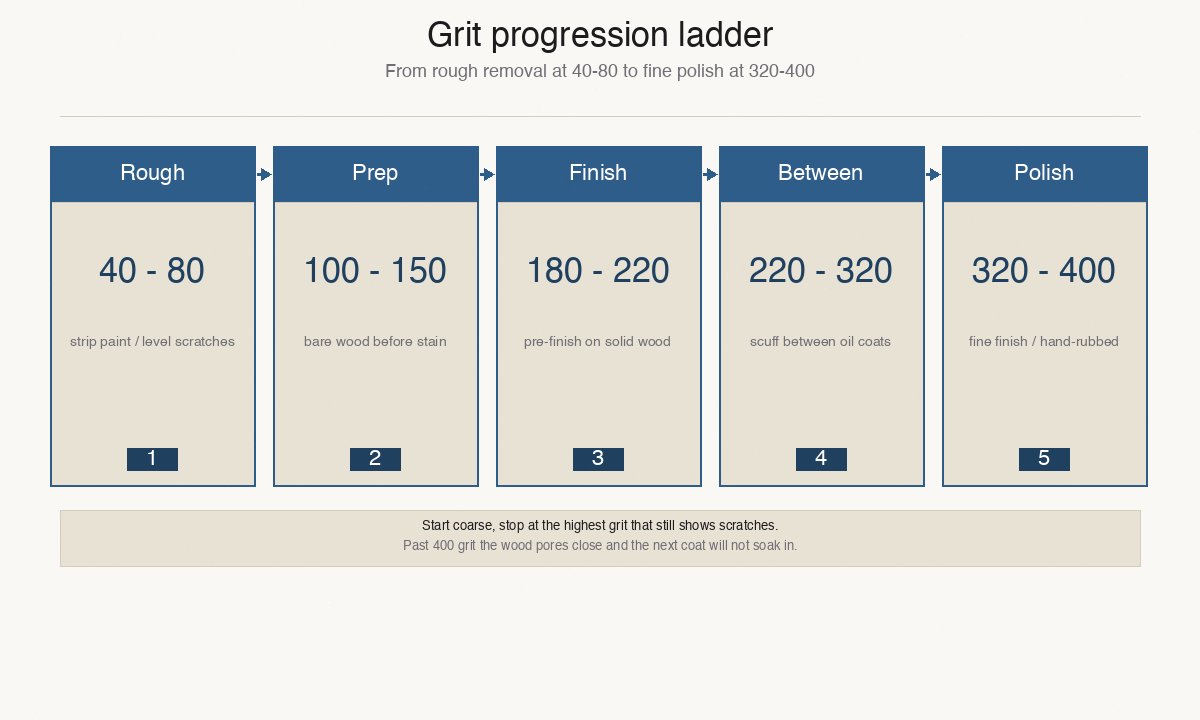
How to read this decision table
Each row pairs a shop scene with one primary grit and a short progression ladder. The primary grit is the sheet you reach for first — start there, then step up only if the surface still shows scratches. CAMI numbers (80, 120, 220) are the US retail grades you read on the package; FEPA P-grades (P80, P120, P180) are European equivalents that run slightly finer at the same number. For US shop use, trust the CAMI number on the sheet.
The Stage column groups scenes into rough removal, prep, pre-finish, between coats, and fine polish — pick a stage first if you already know where you are in the job. The Progression column is a step-up ladder, not a separate buy: skip a step only when deep scratches remain after a pass. Going past the practical ceiling closes the grain and blocks the next finish from soaking in.
Quick answer by stage
Rough removal
Start at 80 grit for stripping paint or leveling scratches. Drop to 60 if the surface is heavily built up or you are working a hardwood floor with a drum sander.
General prep
Use 120 grit for bare wood before stain or paint. Stop at 150 for oil-based poly, 180 for water-based finishes.
Pre-finish smooth
Step to 220 grit on solid hardwood for a clean base. On soft wood, take 180 first to clear cross-grain marks.
Between coats
Scuff with 220 grit between oil-based poly coats. Switch to 320-400 between water-based coats or lacquer.
Fine polish
Finish at 320 grit for satin hand-rubbed furniture or tabletop food-safe prep. Above 400 starts burnishing the grain closed.
Decision table — scene to grit
Eighteen shop scenes mapped to a primary grit, progression ladder, and wood-hardness note.
| Scene | Stage | Primary grit | Progression | Wood | Note |
|---|---|---|---|---|---|
| Stripping old paint or varnish | Rough removal | 80 grit | 60 → 80 → 120 | either | Coarse enough to lift finish, fine enough to avoid dig-in on solid wood. |
| Rough stock removal / leveling | Rough removal | 80 grit | 60 → 80 → 120 | either | For hard wood, take shallower passes; soft wood (pine) scratches deeper, so 100 is acceptable as a coarse start. |
| Leveling plywood or MDF edges | Rough removal | 80 grit | 80 → 120 → 180 | either | MDF edges crush under very coarse paper; 80 is the practical floor for engineered sheet goods. |
| Prep bare wood for paint | General prep | 120 grit | 100 → 120 → 180 | either | Going past 180 seals the grain and hurts paint adhesion; 120-150 is the paint-prep sweet spot. |
| Prep bare wood for stain | General prep | 120 grit | 100 → 120 → 150 | either | Stop at 150-180 max. Slicker sanding closes pores and blocks stain absorption. |
| Prep bare wood for oil-based polyurethane | General prep | 150 grit | 120 → 150 → 180 | either | Oil poly wets the surface and can lift fiber; 180 is the upper bound to keep the grain open. |
| Prep bare wood for water-based finish | General prep | 180 grit | 150 → 180 → 220 | either | Water-based finishes raise the grain less; you can finish to 220 for a smoother base. |
| Between coats of oil-based poly | Between coats | 220 grit | 220 → 320 | either | Light scuff between coats; 320 is acceptable for a satin final scuff. |
| Between coats of water-based poly or lacquer | Between coats | 320 grit | 320 → 400 | either | Water-based coats lay thinner; a 320-400 nib scuff keeps the build-up smooth. |
| Pre-finish smoothing on furniture | Pre-finish smooth | 220 grit | 180 → 220 | hard | Hard wood (oak, maple) holds finer scratch patterns cleanly — 220 is the typical pre-finish stop. |
| Pre-finish smoothing on soft wood | Pre-finish smooth | 220 grit | 150 → 180 → 220 | soft | Pine, poplar, cedar — go past 180 or you risk visible cross-grain tracks under stain. |
| Fine finish for furniture (satin / hand-rubbed) | Fine polish | 320 grit | 220 → 320 → 400 | either | Above 400 you start burnishing the grain closed; 320 is the practical ceiling before wax or oil. |
| Hardwood floor refinishing (drum sander) | Rough removal | 60 grit | 36 → 60 → 80 → 100 → 120 | hard | Drum/belt sanders drop fast to old finish; 60 is the common first-pass grit on solid hardwood. |
| Deck board prep before stain | General prep | 80 grit | 60 → 80 → 120 | soft | Pressure-treated and cedar decks are soft; start coarse to scuff the weathered surface, then refine. |
| Sanding around cured wood filler | General prep | 120 grit | 120 → 180 → 220 | either | Match the surrounding surface; 120 levels the patch, 180-220 blends the patch into the surrounding grain. |
| Cabinet door refinishing | General prep | 150 grit | 120 → 150 → 180 → 220 | either | Detailed door profiles need a step at 150 to remove prior finish without rounding edges. |
| Tabletop / food-safe finish prep | Fine polish | 220 grit | 180 → 220 → 320 | hard | Hard maple and walnut tabletops finish at 220-320; finer grit closes pores that want to stay open under oil. |
| Trim and molding final pass | Pre-finish smooth | 220 grit | 180 → 220 | soft | Pine/finger-jointed trim — 220 leaves the surface clean enough for paint or clear coat without grain raise. |
Sources cited per row. Numeric grits follow US CAMI retail grades.
Hardwood vs softwood — what changes
Solid hardwood (oak, maple, walnut)
Hard wood holds finer scratch patterns cleanly — 220 is the typical pre-finish stop. Take shallower passes at coarse grits to avoid dig-in.
Softwood (pine, cedar, fir)
Soft wood scratches deeper, so 100 is acceptable as a coarse start and 180 the typical pre-finish ceiling. Going past 180 leaves visible cross-grain tracks under stain.
Plywood and MDF edges
MDF edges crush under very coarse paper; 80 is the practical floor for engineered sheet goods. Plywood faces follow the bare-wood prep rules.
Common progressions worth memorizing
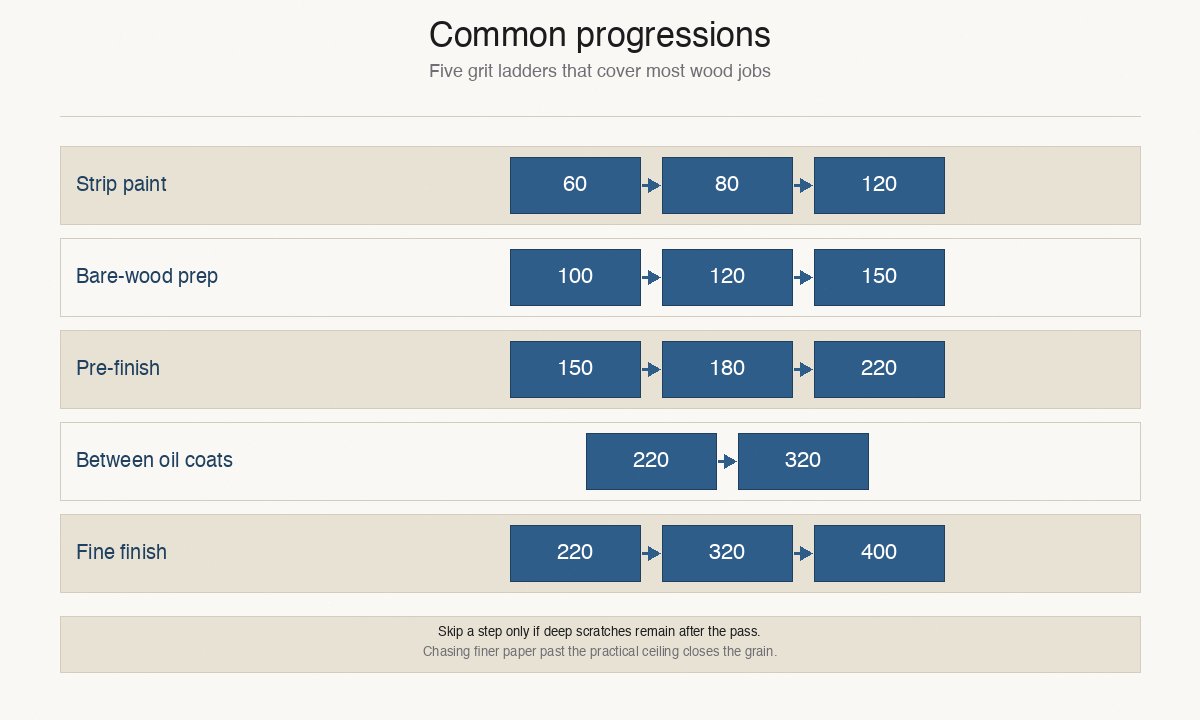
Five progressions cover most shop jobs. Strip paint or built-up varnish: 60 → 80 → 120. Bare-wood prep before stain: 100 → 120 → 150. Pre-finish before oil poly: 150 → 180 → 220. Between oil-poly coats: 220 → 320. Fine finish for furniture or tabletop: 220 → 320 → 400. Skip the fine top of any ladder unless the surface still shows scratches — chasing finer paper past the practical ceiling closes the grain and blocks the next finish from soaking in.
Shop the grit you looked up
Once you have a primary grit from the table, this multi-grit pack covers 80, 120, and 220 in one set — the three sheets most wood jobs use. It is the default shop kit for bare-wood prep, paint removal, and between oil-poly coats.
As an Amazon Associate we earn from qualifying purchases. Disclosure
Need 320 grit or above for water-based poly or satin finishes? Shop waterproof pack (80–400, includes 320 / 400) → — secondary option when the 220 pack stops short.
When the table is wrong for you
Drum or belt sanders
Drum and belt sanders cut fast and need their own grit ladder — typically 36 → 60 → 80 → 100 → 120 on solid hardwood floors. Skip a step and the sander tears up the surface.
Orbital vs hand
Random-orbit sanding leaves a finer scratch pattern than hand sanding at the same grit. You can usually start one step finer than the table suggests when you are using a random-orbit on bare wood.
Veneer and very thin stock
Veneer over plywood is too thin for a coarse grit pass. Stop the table at 150 for any veneer face — coarser paper cuts through the face layer and ruins the panel. Open the grit picker for a veneer-specific ladder.
FAQ
What grit sandpaper should I use to remove stain from wood?
To remove an old stain or penetrating finish, start at 80 grit — coarse enough to break the surface but not so coarse it tears up the wood. Step to 120 grit before any new finish goes on. For paint or varnish built up over many layers, drop to 60 grit for the first pass, then step through 80 and 120.
Is 80 grit too coarse for wood?
80 grit is too coarse for the final pre-finish pass on bare wood, but it is the right starting grit for rough removal and stripping. Going past 180 grit before staining hurts you: slicker sanding closes the wood pores and stops stain from soaking in.
Do I need to sand between coats of stain?
You do not sand between coats of penetrating stain — each coat absorbs into the wood and adding more grit would just scuff the stain film. Sanding matters between coats of film-building finishes (oil poly, water poly, lacquer, shellac). Use 220 between oil-based coats, 320-400 between water-based coats.
What is the difference between grit and sandpaper grade?
Grit is the size of the abrasive particle on the paper — the higher the number, the finer the scratch. CAMI is the US retail standard and uses whole-number grades like 80, 120, 220. FEPA P-grade (P60, P120, P180) is the European equivalent and runs slightly finer than CAMI at the same number. For US shop use, the CAMI number on the package is what you read.
What is the highest grit sandpaper you should use on bare wood?
For bare wood the practical ceiling is around 320 grit for most finish prep, 400 grit at the very top for a hand-rubbed wax or oil finish. Above 400 you start burnishing the grain closed — looks polished but reduces how well the next coat of oil or wax can soak in.
Sources
Scene-to-grit progressions cross-checked against three published references. Numeric grits and progression steps follow common US retail CAMI grades; FEPA P-grade equivalents are noted only where the source uses them.
- Norton Abrasives (Saint-Gobain) — Bare Wood Sanding (retrieved 2026-08-11).
- Family Handyman — What Is Sandpaper Grit? Sandpaper Grit Chart (retrieved 2026-08-11).
- Binic Abrasive — What Grit Sandpaper for Wood? (retrieved 2026-08-11).
- Empire Abrasives — Best Sandpaper for Wood: Choosing the Abrasive Grain and Grit (retrieved 2026-08-11).
Always confirm critical finishes against the finish manufacturer or a sample board — this page is a workshop reference, not a substitute for a product datasheet.
Related
- Abrasives hub — full grit picker, chart pages, and finishing references.
- Grit picker tool — pick a material and stage to get a grit range and a matching pack.
- Drill bit size chart — same lookup pattern for size labels and a matching set.